Rig frequency calibration ― 2024年08月31日 10時17分52秒
The first thing that is important in operating in digital mode is to adjust the PC's time; since FT8 is a synchronous communication tool, it is very important that the PC's time be exactly correct. The method of adjusting the PC time is covered in various places, so I won't go into it here.
The next important step is to adjust the frequency of the rig. If the rig is capable of setting a reference frequency, it is unlikely that the frequency will shift. However, rigs that have such a function are usually high-end.
Super Fox mode has been used in recent DX peditions. There have been a number of posts to X and others from people who say that the signal is strong but cannot be decoded properly.
It is said that one of the causes is the frequency mismatch of the receiving rig.
In SSB/CW operation, the frequency discrepancy of the rig is not so much of a concern, but in FT8 operation, if the frequency discrepancy is too large, it may lead to the fact that the range displayed in the wide graph is actually different from the range displayed in the graph.
Even if it is not that extreme, there may be some who are off by several Hz to several hundred Hz.
The reference frequency DF for SF mode is 750 Hz. If you receive a station operating in SF mode, and when it is decoded, the DF of the other station displayed is off from 750 Hz, it means that the frequency of the other station's rig is different from your own rig.
It does not necessarily mean that the other party is using a rig that is calibrated exactly, but in most cases, the other party is not using a rig that is off by several hundred Hz.
If this is the case, then the frequency deviation of your station's rig may be the cause of the decoding failure.
Here is the information I have obtained
The decoding was +/- 200Hz on the WSJT-X rc5, but +/- 100Hz on the rc6, compared to 750Hz on the reference signal.
This means that the frequency discrepancy should be kept below 100Hz.
For example, the ICOM IC-7300, a super popular ICOM rig that has sold 100,000 units worldwide. Unfortunately, the IC-7300 does not have a reference frequency. The instruction manual describes how to adjust it while receiving a standard frequency such as 10MHz 20MHz. However, I would like to introduce you how to adjust the frequency visually using software rather than by listening with your own ears and feeling the “roar”.
Here I will write an example for ICOM IC-7300, but you can do the same for other ICOM and YAESU rigs that are capable of adjusting the reference frequency. Please read the instruction manual carefully by each person. Please do so at your own risk.
The software used is the familiar WSJT-X. The mode used is FreqCal.
The work about to be done is better after the rig has warmed up sufficiently, so it should be done after some time has elapsed since the power was turned on. In my case, I did this after about 2 hours of normal operation after turning on the power.
Please read WSJT-X USER GUIDE 13.1 first.
Launch WSJT-X and go to Settings > Frequencies.
Click “mode” under Working Frequencies and scroll down to FreqCal.

You will see 5MHz, 10MHz, 15MHz, and 20MHz listed, but you can also add the frequencies of local AM stations that you can receive.
If Frequency Calibration has a number in it, set it to 0.

Then click on “Execute frequency calibration cycle” from the menu Tools.

On the main screen, check the “Measure” checkbox in the fourth row under “Monitor”.

Leave it for a few minutes and WSJT-X will change the frequency every 30 seconds.
You will see a line at 1500, but if the rig's reference frequency is off, the line will shift more and more with each band change.

In this state, try moving the value of the rig's reference frequency adjustment. Set it to a value where the DF value becomes smaller at any frequency. Then, the deviation is almost eliminated. If you go to FUNCTION from the SET screen of the IC-7300, you will find REF Adjust on the last page.


-----------------------------------------------------
From here, we can further refine the settings. Even if your rig is not equipped with a reference frequency adjustment function, you can adjust it to a very good point by following the steps below.
Start WSJT-X again and go to Settings > Frequencies.
Click on “mode” under Working Frequencies and scroll down to FreqCal.
Then go to “File” in the menu and select “Open Log Directory” and delete the file “fmt.all” if it exists.
Then click on "Execute frequency calibration cycle” from the menu Tools.
On the main screen, check the “Measure” checkbox in the fourth row under “Monitor”.
Leave it for a few minutes and WSJT-X will change the frequency every 30 seconds.
After a few minutes, the calibration parameters will be calculated from the menu tool.


If the measurement results are good, the message “Good Calibration Solution” will appear and click “Apply”. Then go to the menu and go to “Settings” and then to “Frequency” and note the values for Slope and Intercept in the “Frequency Calibration” section.

If you have strange data, you will get a message like this and the calculation will not work. Please refer to the items explained later.

JTDX users can also set these values from the menu, go to Frequency, enter the same values, and you are done.
This way, even if the rig's frequency is slightly off, the correct DF will be displayed.
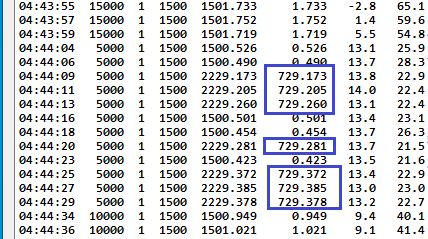
If the frequency calibration does not work, open fmt.all in the log directory with a text editor. Delete the lines marked with an asterisk, save the file, and let the parameters calculate again. Also delete the lines with extremely misaligned values.

コメント
トラックバック
このエントリのトラックバックURL: http://jp1lrt.asablo.jp/blog/2024/08/31/9713282/tb
※なお、送られたトラックバックはブログの管理者が確認するまで公開されません。
コメントをどうぞ
※メールアドレスとURLの入力は必須ではありません。 入力されたメールアドレスは記事に反映されず、ブログの管理者のみが参照できます。
※なお、送られたコメントはブログの管理者が確認するまで公開されません。
※投稿には管理者が設定した質問に答える必要があります。